
There is a new term in the Dev Ops world called GitOps everyone is talking about. If you are wondering what is it about, this article is for you! I will introduce you to the concept of GitOps and show you how to get started with Argo CD, the go to tool for your GitOps journey. All you need is an up and running Kubernetes cluster.
What is GitOps?
You are most probably familiar with the concept of Continuous Deployment. Which means in easy words, you have an application which is deployed somewhere, than you do some updates on your application and now you want to deploy the new version. Usually you have a pipeline for that, in form of Jenkins, GitHub Actions, GitLab CI/CD or something similar. It’s a push-based deployment concept.
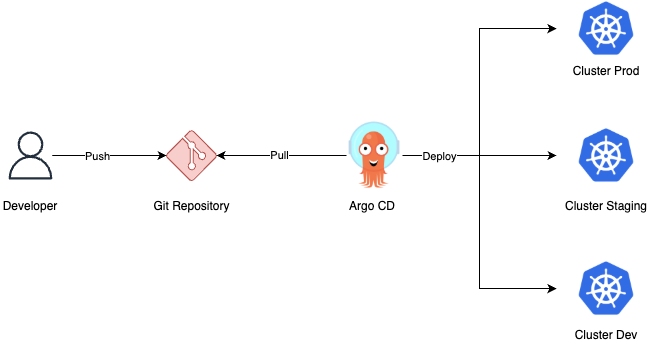
And here we are switching it up to a pull-based concept. Instead of your pipeline, you have an operator deployed in form of the tool ArgoCD for example, and it watches your repository where your application manifest is stored. As soon as some changes happen to your repository, ArgoCD takes them and updates your application, deployed on the cluster.
No Complex CD Pipelines Anymore
The times are over where developer teams had to write their own CD pipelines. With GitOps you have one tool up and running which connects to the Git repositories and handles the rest. No need anymore for writing complex CD pipelines. And all your history is in your Git repository anyway.
Fast Error Recovery
You messed up anything with you new update? No problem, just revert the last Git commit! GitOps will detect the change and deploy back the previous version.
Easier Credential Management
If you are working with multiple developer teams together, it’s always a security risk to hand out cluster access. With GitOps you do it the other way around. Your environment only needs access to the repository and image registry. That’s it. You don’t have to give your developers direct access to the environment. Kubectl is the new ssh!
Git Repository Environment Configuration
With GitOps your repositories are becoming the new central element. You will have at least two repositories: the application repository and the environment repository.
- The application repository contains all the application source code as usual and the application manifest to deploy the application.
- The environment repository contains all deployment manifests of the desired infrastructure of an environment. So all the application manifests and additional manifests for the needed infrastructure of your cluster, like message broker, monitoring tools, etc.
Install Argo CD
The installation process is quite straightforward. In this example we are installing ArgoCD in the same cluster as the applications will be deployed. So SSH into your server or whereever your cluster is running and run the following commands:
kubectl create namespace argocd
kubectl apply -n argocd -f https://raw.githubusercontent.com/argoproj/argo-cd/stable/manifests/install.yamlYou can check the setup status by executing:
kubectl get pods -n argocd

NAME                                                READY   STATUS    RESTARTS   AGE
argocd-application-controller-0                     1/1     Running   0          1d
argocd-applicationset-controller-6234fw8ff8-rrbt2   1/1     Running   0          1d
argocd-dex-server-7d9dfb4fb8-masds                  1/1     Running   0          1d
argocd-notifications-controller-6c6848bcasdfc-c4hxc    1/1     Running   0          1d
argocd-redis-asdf56c79549c-rrnvg                       1/1     Running   0          1d
argocd-repo-server-856b768fasdf9-dasdftw8                 1/1     Running   0          1d
argocd-server-99c485944-bx4jasdf 1/1 Running 0 1dExpose Argo CD
Within the ArgoCD setup bundle is a handy web application, which makes it easier to get an overview and monitor your applications. To make it reachable, you need to expose it somehow. We are using the Nginx Ingress Controller with an Cluster Issuer and Let’s Encrypt for the TLS encryption. If you need some help to that up, please follow along my blog post which guides you through.
If you have your Ingress Controller in place, you can go ahead and create your Ingress manifest by creating a new file called ingress_argocd.yaml and insert the following:
apiVersion: networking.k8s.io/v1
kind: Ingress
metadata:
  name: argocd-server-ingress
  namespace: argocd
  annotations:
    # reference to your ClusterIssuer
    cert-manager.io/cluster-issuer: "letsencrypt-nginx"
spec:
  ingressClassName: nginx

  tls:
    - hosts:
        - argocd.<domain>
      secretName: argocd-tls

  rules:
    - host: argocd.<domain>
      http:
        paths:
          - path: /
            pathType: Prefix
            backend:
              service:
                name: argocd-server
                port:
number: 80Make sure to replace the domain, and apply it by running:
kubectl apply -f ingress_argocd.yamlCreate DNS Record
Next, lookup your external IP-address of your Ingress Controller
kubectl get svc -n ingress-nginxand go to your domain provider to create a new DNS record with the external-IP as the target and the value should be argocd. With that you will reach your service at argocd.<_your-domain_>.
Login into ArgoCD
Everything is ready to login into ArgoCD now. The default username is admin and to get your password, run the following:
kubectl -n argocd get secret argocd-initial-admin-secret -o jsonpath="{.data.password}" | base64 --decodeThis is your initial password. It is recommended to change it afterwards! But for now open your browser and navigate to https://argocd.<_your-domain_> and enjoy your GitOps journey!