
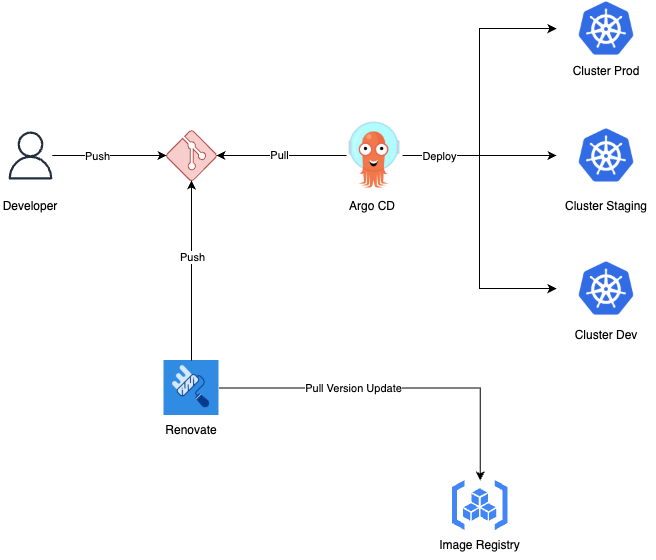
I guess you already heard about the term GitOps. If not, please take a look at my introduction article! In easy words, GitOps changes the Continuous Delivery process, instead of creating pipelines to push your updates to deployment, you will have a tool like Argo CD sitting around to pull your updates from the Git repository and deploys them by itself to your environment.
That is handy, and makes your life easier. You are most probably already spending enough time with configuring your manifests and values files, so it comes as a relief that you don’t also have to take care of creating additional deployment pipelines for synchronizing your configuration changes. In combination with Renovate, your Kubernetes applications will also stay up to date automatically. You can imagine how powerful these tools can be if you use them correctly.
And that is exactly what that article is about! You will see that GitOps architecture in action! With a WordPress Blog as example application, you will deploy it with the help of ArgoCD to your cluster and Renovate will keep it up to date.
Prerequisites
- Running Kubernetes cluster
- ArgoCD
- Ingress Controller deployed on your cluster
- Domain
WordPress Configuration
Let’s start by setting up WordPress. To begin, download the Helm Chart and make sure it is up-to-date:
helm repo add bitnami https://charts.bitnami.com/bitnami
helm repo updateAfterwards, download the default values file as you need to adjust some configurations:
helm show values bitnami/wordpress > values.yamlNow you can open your values file and change the following configurations. Here we are using the Ingress Nginx Controller with a Cluster Issuer and Let’s Encrypt for exposing your WordPress. Feel free to use a different exposing method or if you need some guidance how to set it up, take a look on at my article about.
wordpressUsername: <username>
wordpressPassword: <password>
wordpressEmail: <email address>
wordpressFirstName: <name>
wordpressLastName: <last name>
wordpressBlogName: <website title>
wordpressTablePrefix: wp_

service:
    type: ClusterIP

ingress:
    enabled: true
    pathType: Prefix
    ingressClassName: nginx
    hostname: <your domain>
    path: /
    annotations:
        kubernetes.io/ingress.class: nginx
        cert-manager.io/cluster-issuer: letsencrypt-nginx
    tls: true

mariadb:
    enabled: true
    architecture: standalone
    auth:
        rootPassword: admin
        database: bitnami_wordpress
        username: wp_<username> # make sure to have the defined prefix in front of your username!
password: <password>ArgoCD Application
Now comes ArgoCD into play, instead of directly deploying the Helm chart, you will create an Application manifest which points to the WordPress image registry and your custom values file inside your repository. Like that, the Helm chart and all its related images will be directly downloaded and deployed and your custom configurations remain. So let’s start with connecting Argo CD to your GitHub repository!
Create Github Repo Template
As ArgoCD will constantly pulling your repository for changes, you need to provide some kind of access to it. The most common way is to create a SSH key for that, so create one and store the public key to your GitHub account:
ssh-keygen -t ed25519 -C "your_email@example.com"Then copy the private key and create a secret manifest called github_secret.yaml where you embed the key at stringData.sshPrivateKey:
apiVersion: v1
kind: Secret
metadata:
  name: private-repo
  namespace: argocd
  labels:
    argocd.argoproj.io/secret-type: repo-creds
stringData:
  type: git
  url: git@github.com:<_Your_Account_>
  sshPrivateKey: |
    -----BEGIN OPENSSH PRIVATE KEY-----
    asdfkljsthoj8945j8t9j23fjq9edjPHF239849fjphsdfjohphhjlHFUOIAWHFLaslkjd
    ...
    asdlfh34jfDSflakjeflkaejhnrlkaejrnlkjfnakjdfnalafelkrjbelkgbv453EWqs==
-----END OPENSSH PRIVATE KEY-----Deploy the new secret to your cluster:
kubectl apply -f github_secret.yamlThat secret acts as a template for your GitHub repository. Like that you don’t need to always create a new connection to it if you synchronize another repository from your account with Argo CD.
Create ArgoCD Application
This leads us to the main part, the Application manifest. All Applications have to be deployed at the namespace argocd and we are using two sources
- Public Helm chart repository: contains the official WordPress Helm chart.
- Your GitHub repository: contains the Application manifest and your configured values file.
Create a file called argocd_wordpress_app.yaml and adjust the configuration to your needs:
apiVersion: argoproj.io/v1alpha1
kind: Application
metadata:
name: wordpress
namespace: argocd
spec:
project: default
sources:
- repoURL: https://charts.bitnami.com/bitnami
chart: wordpress
targetRevision: 25.0.0
helm:
  valueFiles:
  - $values/<Path_To_Your_Values_File>/values.yaml
- repoURL: git@github.com:<GitHub_Account_Name>/<Repository_Name>.git
targetRevision: main
ref: values
destination:
server: https://kubernetes.default.svc
namespace: wordpress
syncPolicy:
automated:
  prune: true
  selfHeal: true
syncOptions:
- CreateNamespace=trueThat Application manifest alone would already be enough to start with. But as we are also going to implement an auto updating feature with Renovate, we need an additional manifest.
Create ArgoCD Management Application
The reason for the second Application manifest is that we will use Renovate to update the targetRevision tag as soon as a new Helm chart version gets released. Out of the box ArgoCD won’t detect the changes in the manifest and so won’t upgrade to the new version. Therefore, we make use of the app of apps concept. Where we have a manager Application which tracks the Git repository for changes. Create a new file called argocd_wordpress_manager.yaml and adjust the following configurations for it:
apiVersion: argoproj.io/v1alpha1
kind: Application
metadata:
  name: wordpress-manager
  namespace: argocd
spec:
  project: default
  source:
    repoURL: git@github.com:<GitHub_Account_Name>/<Repository_Name>.git
    targetRevision: main
    path: wordpress
  destination:
    server: https://kubernetes.default.svc
    namespace: argocd
  syncPolicy:
    automated:
      prune: true
      selfHeal: true
    syncOptions:
- CreateNamespace=trueNow you are ready to deploy your Application, apply the argocd_wordpress_manager.yaml manifest:
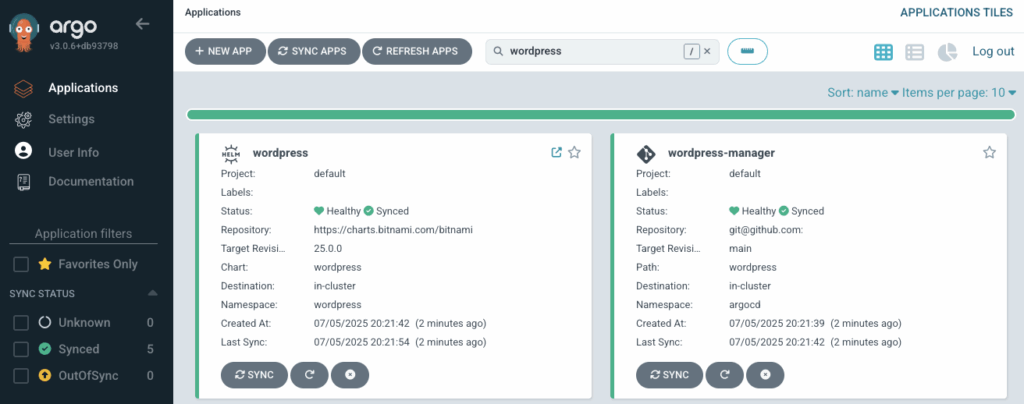
kubectl apply -f argocd_wordpress_manager.yamlWhen you login to your ArgoCD UI you will see two new Applications. Wait a bit until everything got deployed and it should look like that:
Create DNS Record
Don’t forget to create the DNS record for your website! Lookup your external IP-address of your Ingress Controller:
kubectl get svc -n ingress-nginxthen go to your domain provider to create a new DNS record with the external-IP as the target and as you wish set it as a subdomain or your main website. Wait a bit till the DNS record got updated and you are ready to view your new WordPress website!
Renovate Setup
As already mentioned, we will also integrate Renovate for keeping your Helm Chart up to date. It is a powerful tool which checks periodically all kind of images like Docker images, Helm Charts, etc. for a new version. If there is one, Renovate creates a pull request which you can accept to update the version tags. In combination with ArgoCD it keeps our manual intervention to a minimum, but on the same way avoids blindly applying major updates that could break your system.
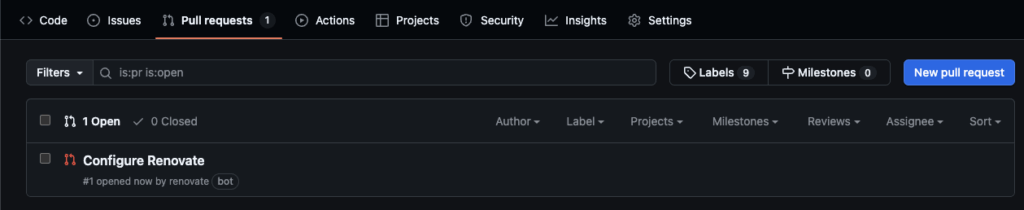
Go to the GitHub marketplace https://github.com/marketplace/renovate and install Renovate by clicking on Configure and than just go through the installation steps. Select your target repository instead of adding Renovate to all of your repos. You will be forwarded to Renovates website where you have to register. Afterwards you can go back to your GitHub repository and you will see a new pull request.
In the pull request you can see that Renovate automatically detects package files which will be monitored for updating.
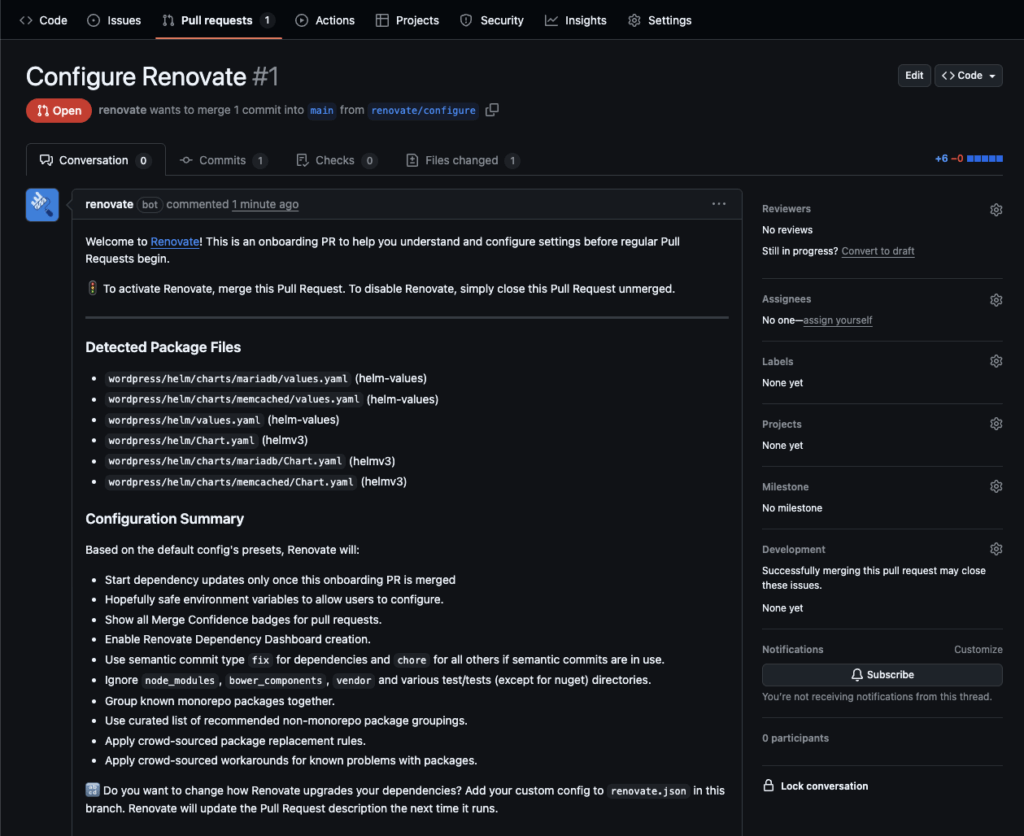
It will also initialize it’s default configuration with a file called renovate.json in the root directory.
{
  "$schema": "https://docs.renovatebot.com/renovate-schema.json",
  "extends": [
    "config:recommended"
  ]
}You need to tell Renovate about the Helm Chart by providing a fileMatch attribute which says that all files of the logic should be checked:
{
  "$schema": "https://docs.renovatebot.com/renovate-schema.json",
  "extends": ["config:recommended"],
  "prHourlyLimit": 10,
  "argocd": {
    "fileMatch": [
      "wordpress/.*\.yaml"
    ]
  }
}If you have your manifest in a different directory, adjust the path to your needs! Play around with it by changing the targetRevision tag in your Application manifest to an older version and wait till Renovate detects it. You will than see a new pull request with the newest version. Confirm the pull request and watch ArgoCD deploy it automatically!
Conclusion
That’s all for now! With the introduced architecture you should be able to have an easy deployment process for all your Kubernetes services. I hope it was helpful! Feel free to share your thoughts, leave a comment in case you need support or give me some overall feedback!